Are you struggling to share your Apple iOS device photos with friends, family, or colleagues due to compatibility issues? You’re not alone!
By default, Apple iOS devices save images in HEIC (High-Efficiency Image Format) rather than the widely accepted JPG format. This can lead to frustrating error notifications and limited sharing options.
But don’t worry! In our beginner’s guide, we’ll walk you through three easy ways to convert HEIC or HEIF images into JPG for free. Once you convert your HEIC files to universally compatible JPG images, you can seamlessly share your memories with the world!
Beginner’s Guide on How to Convert HEIC Files to JPEG
What are HEIC or HEIF files?
Beginning with iOS 11, Apple introduced a new image format known as High-Efficiency Image Container (HEIC) or High-Efficiency Image File (HEIF). These advanced file types were adopted to replace the traditional JPG format primarily because of their superior compression capabilities. With HEIC or HEIF files, you can store high-quality images in significantly smaller file sizes, saving valuable storage space on your Apple devices without sacrificing image quality.
3 Ways to Convert HEIC to JPG for Free
Looking for a convenient way to convert your HEIC images to a universally compatible JPG format? We’ve compiled three free and user-friendly solutions to help you tackle the HEIC challenge, regardless of whether you’re using Android, iOS, or Windows devices.
To kick things off, we’ll begin with Automator, a built-in application on your Mac that offers a seamless conversion experience. Stay tuned to explore other versatile options that cater to all your HEIC-to-JPG conversion needs.
1. Convert HEIC Files on a Mac Using Automator
If you’re a Mac user seeking a simple solution to convert your HEIC images to JPG format, look no further than Automator! This built-in application has been available since Mac OS X version 10.4 (Tiger). Allows you to create customized workflows that automate repetitive tasks.
In this step-by-step guide, we’ll show you how to harness the power of Automator to convert your HEIC files to JPGs effortlessly.
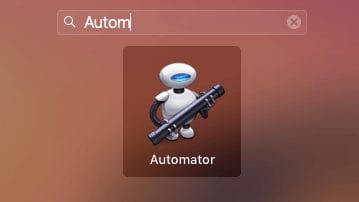
- Launch Automator, which can be found under your Applications folder.
- On the left-hand side, type “copy finder” into the search box and drag “Copy Finder Items” to the right-hand side of the screen.
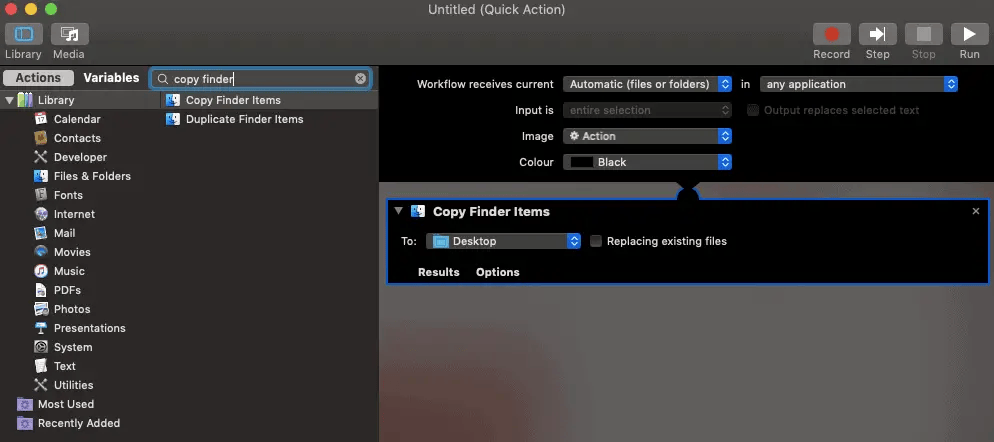
- Choose the folder where you want to save your converted images by clicking the “To” drop-down menu.
- Next, search for “Change Type” on the left-hand side of the screen. Then drag “Change Type of Images” to the right-hand side of the screen.
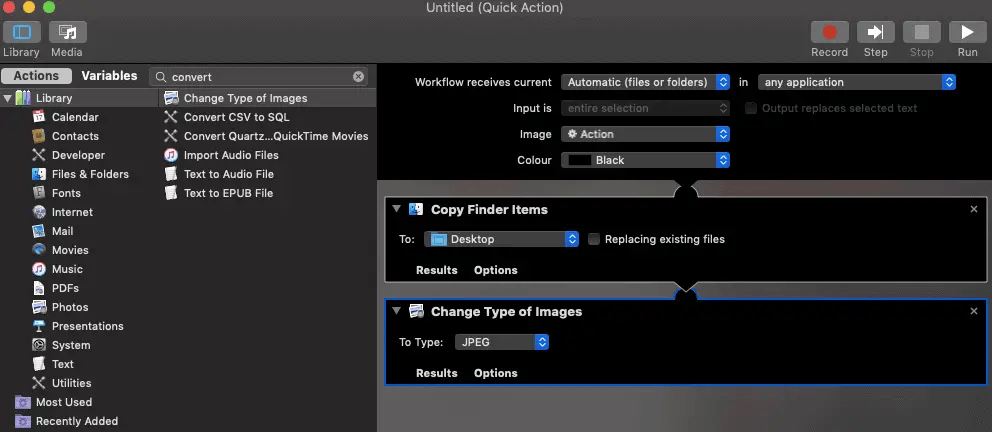
- In the drop-down menu within the “Change Type of Images” action, select “JPEG” as the desired format.
- From the menu bar, click “File” and select “Save”. Enter a name for your quick action and click “Save” again.
- To use your newly created quick action. Right-click on the HEIC file you’d like to convert. Then select “Quick Actions” and choose the quick action you’ve just created.
Now you can easily convert HEIC files to JPG format using Automator on your Mac!
2. HEIC Conversion with iMazing: A User-Friendly Solution for Mac & PC
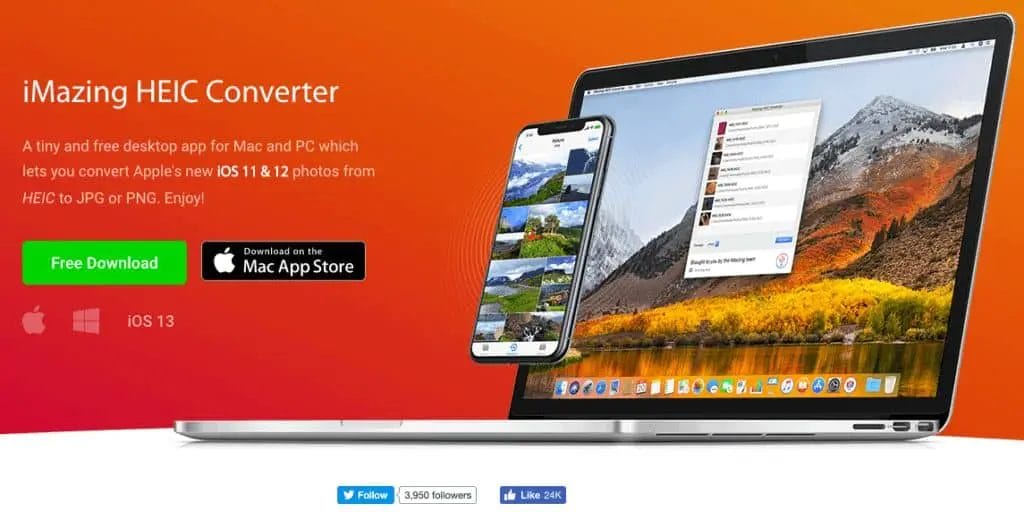
For those who prefer using third-party applications for HEIC conversion, iMazing offers a free and efficient desktop app compatible with both Mac and PC. Embrace Apple’s innovative image format without fretting over compatibility issues with older software. iMazing effortlessly converts your HEIC photos to JPG or PNG.
iMazing HEIC Converter’s intuitive interface makes the conversion process a breeze. Simply drag and drop your HEIC files into the app, click “Convert,” and watch your JPG or PNG images appear in seconds. With iMazing, you can enjoy the convenience of Apple’s image format while maintaining cross-platform compatibility.
3. HEICtoJPG.com: A Versatile Online HEIC Converter
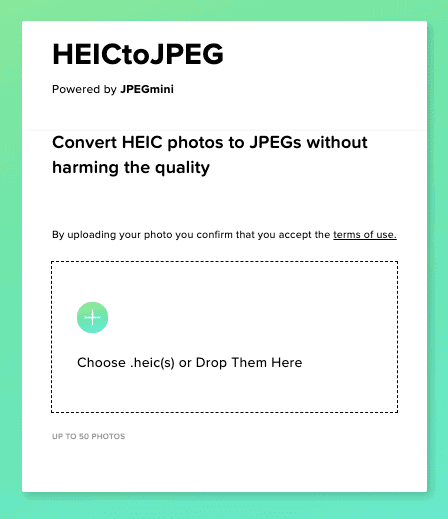
Looking for an alternative to Mac-based Automator or hesitant about downloading third-party software? Meet HEICtoJPG.com, a user-friendly online platform designed to convert your HEIC files with ease. Powered by JPEGmini, a cutting-edge photo optimization technology, this free service allows you to convert up to 50 photos, ensuring your JPEG images maintain excellent quality with reduced file sizes.
Converting your files couldn’t be simpler. Navigate to HEICtoJPG.com, click “choose” or drop your HEIC files directly onto the website. After a brief processing period, your images will be converted and ready for download in the universally compatible JPEG format. Experience seamless sharing and usage of your photos with HEICtoJPG.com.
Conclusion
converting HEIC files to the widely accepted JPG format no longer needs to be a daunting task. With the solutions presented in this beginner’s guide, you can choose the method that best suits your preferences and device. Whether you opt for the built-in Automator on your Mac, the versatile iMazing desktop app, or the online convenience of HEICtoJPG.com. You’ll find a hassle-free way to ensure your photos are shareable and compatible across platforms.
By exploring these three easy, free, and effective methods to convert your HEIC or HEIF images into JPG, you can now effortlessly share your memories with friends, family, or colleagues without worrying about compatibility issues. So, go ahead and capture those special moments, knowing that you have reliable solutions at hand for all your HEIC-to-JPG conversion needs.

